
Merchant Integration
How to accept payments with Circuit. Two integration paths, one payment model.
- Web / hosted checkout — the fastest path. Your backend creates a session; Circuit hosts the payer's checkout page; the payer is redirected back to you. Minimal code, no payer PII touches your servers.
- Direct API — full control. Your own website or mobile app renders the payer flow natively and calls Circuit's API directly. More work, more control.
Both paths run on the same PaymentIntent model — hosted checkout is just Circuit's own frontend built on the public API.
0. Before you integrate — get your account production-ready
You can build and test in sandbox immediately after signup, using your test keys. Going live requires two things:

sk_test_*/pk_test_*work at any time → sandbox.sk_live_*/pk_live_*are rejected (403) until your account is production-ready: KYB verified AND a payout destination linked. Check status any time:
GET /merchants/{merchantId}/readiness   (session-authenticated)
→ { productionReady, payoutRail, checklist: { kybVerified, payoutDestinationLinked }, nextSteps }
The payout rail is set by your country at signup: US/CA → Cybrid (bank), elsewhere → YellowCard (mobile money / bank). Onboarding differs by rail — see the Merchant Onboarding guide.
1. Keys
| Key | Where it lives | What it does |
|---|---|---|
sk_live_* / sk_test_* | Your backend only (never ship to a browser/app) | Creates checkout sessions & PaymentIntents; all account-level calls |
pk_live_* / pk_test_* | Safe in client-side code | Used with a client_secret to drive one payer flow |
client_secret | Returned per PaymentIntent | Lets a client SDK act on exactly one PaymentIntent |
Issue keys: POST /merchants/{merchantId}/api-keys (returns the secret once — store it). Rotate: POST /merchants/{merchantId}/api-keys/rotate.
Base URLs: API https://api.circuit.com · hosted checkout https://checkout.circuit.com. For sandbox/dev, point at your dev API base URL and use test keys.
2. Path A — Web / hosted checkout (recommended)
Three steps: your backend creates a session → you redirect the payer → you verify the result.
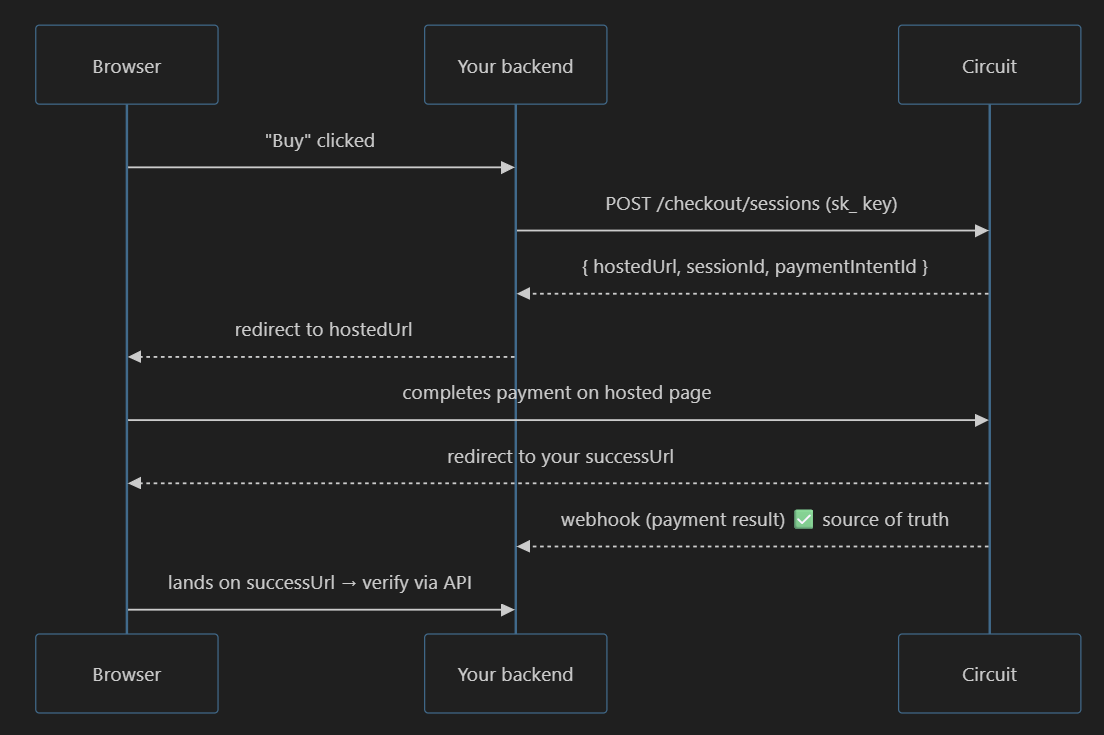
2.1 Create a checkout session (your backend)
POST /checkout/sessions
Authorization: Bearer sk_test_...
Content-Type: application/json

{ "amountUSD": 5.00, "successUrl": "https://yourstore.com/success",
  "cancelUrl": "https://yourstore.com/cart", "clientReferenceId": "order_123" }
{ "success": true, "data": {
"sessionId": "...", "paymentIntentId": "...",
"clientSecret": "..._secret_...",
"hostedUrl": "https://checkout.circuit.com/...",
"expiresAt": "2026-01-01T00:30:00.000Z" } }Redirect the browser to hostedUrl. That's it — Circuit hosts the payer info, rate quote, payment method, and confirmation steps.
2.2 Use a web SDK (optional, thinner)
A framework SDK wraps the redirect so you don't hand-roll it. All are redirect-based; your backend still creates the session.
| Framework | Package |
|---|---|
| React | circuit-checkout-react |
| Vue 3 | circuit-checkout-vue |
| Angular | circuit-checkout-angular |
// React example
import { CircuitCheckoutProvider, useCircuitCheckout } from 'circuit-checkout-react';

function BuyButton() {
  const { redirectToCheckout } = useCircuitCheckout();
  async function buy() {
    const { hostedUrl } = await fetch('/api/checkout', { method: 'POST' }).then(r => r.json());
    redirectToCheckout({ hostedUrl }); // single click → straight to checkout
  }
  return <button onClick={buy}>Buy now</button>;
}
2.3 Confirm the result (do NOT trust the redirect alone)
The payer landing on successUrl is not proof of payment. Confirm one of two ways:
- Backend re-verify:
GET /v1/payment-intents/{paymentIntentId}and checkstatus. - Webhook (authoritative): configure
POST /merchants/{merchantId}/webhook-config; Circuit delivers an HMAC-signed (Circuit-Signature) event when the payment settles.
This is the source of truth — fulfill the order on the webhook, not the redirect.
2.4 Payment links — share a URL, no frontend required
The hostedUrl returned by POST /checkout/sessions is a payment link. You don't have to embed anything or run a checkout page — generate the URL on your backend and send it to the payer however you like (WhatsApp, SMS, email, a QR code, a “Pay” button on an invoice). When they open it, Circuit hosts the entire checkout and redirects them to your successUrl when done.

# Generate a payment link for $25 and send it to a customer
curl -X POST https://api.circuit.com/checkout/sessions \
  -H "Authorization: Bearer sk_test_..." \
  -H "Content-Type: application/json" \
  -d '{ "amountUSD": 25.00,
        "successUrl": "https://yourstore.com/thanks",
        "cancelUrl":  "https://yourstore.com/canceled",
        "clientReferenceId": "invoice_2026_0042" }'

# → data.hostedUrl is the link you share. e.g.
#   https://checkout.circuit.com/{sessionId}#...
What to know about these links:
- One payer, one payment. A session is scoped to a single checkout attempt with a short expiry (
expiresAtin the response). For each customer/invoice, generate a fresh link — don't reuse one link across many payers. - Fixed amount. The amount is set when you create the session. To charge a different amount, create another session.
- Reconcile with
clientReferenceId. Pass your own order/invoice id; it comes back on the webhook so you can match the payment to what it was for. - The webhook is still the source of truth — a shared link is convenient, but fulfill the order on the verified
Circuit-Signaturewebhook, exactly as in §2.3.
Need a reusable, non-expiring link (create once, collect from many payers, like a donation or a product page)? That's a distinct feature and is not available yet — today every link is a per-payer session. Generate one per customer for now.
3. Path B — Direct API (custom UI, web or mobile)
Your frontend renders the payer flow natively and calls Circuit directly. Your backend creates the PaymentIntent with the secret key; your frontend confirms it with the publishable key + client_secret.
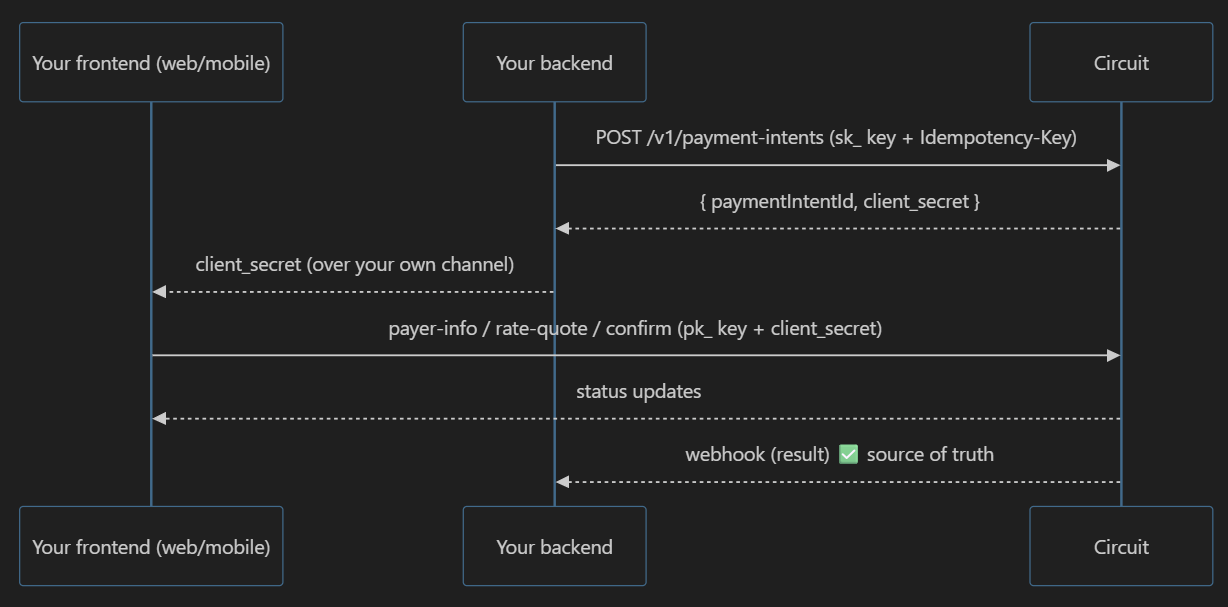
3.1 Create a PaymentIntent (your backend)
POST /v1/payment-intents
Authorization: Bearer sk_test_...
Idempotency-Key: <unique-per-attempt>      ← REQUIRED
Content-Type: application/json

{ "amountUSD": 5.00 }
{ "success": true, "data": {
"paymentIntentId": "...", "clientSecret": "..._secret_...",
"status": "requires_payment_method", "amountUSD": 5.00 } }Pass the clientSecret down to your frontend over your own secure channel (your responsibility, same as Stripe's model).
3.2 Confirm from the client (publishable key + client_secret)
Your frontend drives the payer-facing steps directly against /v1/payment-intents/{id}/* using the publishable key + client_secret. Use a native SDK so you don't hand-build the state machine:
| Platform | Package / module |
|---|---|
| React Native | circuit-checkout-react-native |
| iOS (Swift) | CircuitCheckout (SwiftPM) |
| Android (Kotlin) | com.circuit:checkout |
| Flutter | circuit_checkout |
// iOS example — present the native checkout for one PaymentIntent
CircuitCheckout.present(
  publishableKey: "pk_test_...",
  clientSecret: "...",          // from your backend
  apiBaseUrl: "https://api.circuit.com/"   // override for sandbox/dev
)
The native SDKs render payment-method selection (momo / bank / card, per country) and confirmation natively — no WebView. They never see your secret key.
3.3 Read status / verify
GET /v1/payment-intents/{paymentIntentId} (secret key on your backend, or publishable key + client_secret from the client). As with hosted checkout, the outbound webhook is the authoritative payment result — never treat a client-side result as final.
4. Cashout accounts — where you get paid
Your cashout account is the destination Circuit settles your funds to. It depends on your rail (set by your country at signup):
- US / CA (Cybrid rail): a bank account linked via Plaid.
- Other / Africa (YellowCard rail): a mobile-money or bank account.
4.1 Link your cashout account
Linking is rail-specific and validates the account with the provider:
# US/CA — link a bank via Plaid (session-authenticated)
POST /merchants/{merchantId}/cybrid/plaid-link-token     # get a Plaid link token
POST /merchants/{merchantId}/cybrid/bank-account         # link the account

# Africa — link a mobile-money / bank destination (session-authenticated)
GET  /merchants/{merchantId}/yc/payout-networks?country=NG   # pick your network
POST /merchants/{merchantId}/yc/payout-destination          # link + validate it
The first account you link becomes your default. A validated cashout account is one of the two things required to go to production (see §0).
4.2 One account, or many?
By default a merchant has one cashout account per rail — linking a new one is blocked while one already exists:
// linking a 2nd account as a standard merchant → 403
{ "error": {
    "code": "FORBIDDEN",
    "message": "This account may hold only one cashout account. An admin must enable multi_account to add more; or remove the existing one first.",
    "details": { "accountLevel": "standard", "requiredAccountLevel": "multi_account" } } }
Multiple cashout accounts are available to merchants on the multi_account tier (enabled by a Circuit admin — contact us). A multi_account merchant can hold many accounts, mark one as the default, and route individual payments to a specific account.
4.3 Manage your accounts (multi_account)
GET    /merchants/{merchantId}/payout-destinations                       # list all, with isDefault
POST   /merchants/{merchantId}/payout-destinations/{destinationId}/default   # set the default
DELETE /merchants/{merchantId}/payout-destinations/{destinationId} # remove one- Exactly one default per rail — setting a new default clears the old one automatically.
- Removing the default promotes another account to default (so you always have one).
- Account numbers are returned masked (e.g.
••••5678).
4.4 Route a payment to a specific account
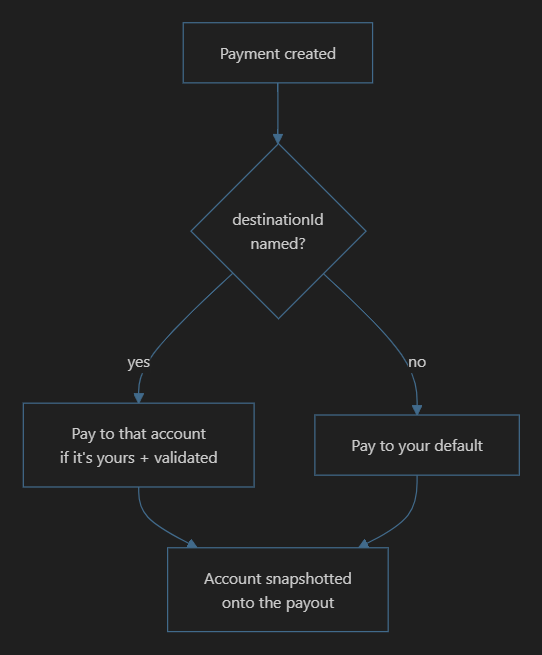
When you create a PaymentIntent, you may name which cashout account should receive it; omit it to use your default:
POST /v1/payment-intents
Authorization: Bearer sk_live_...
Idempotency-Key: <unique>

{ "amountUSD": 5.00, "destinationId": "<one of your payout-destination ids>" }
The chosen account is locked in when the payment is created — changing your default afterward does not redirect a payment already in progress.
5. Which path should I use?
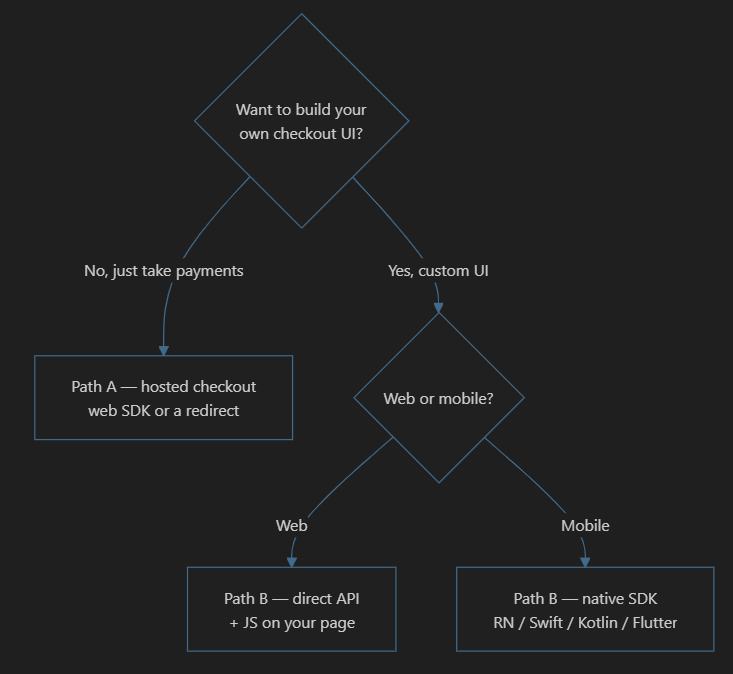
- Fastest to live: hosted checkout (Path A) — a few lines, no payer PII on your servers.
- Fully custom look & feel: direct API (Path B) with the framework or native SDK.
- Hosted checkout is itself built on the same public API, so you can start with Path A and move to Path B later without changing your backend's session/intent model.
6. Integration checklist
- Sign up with your country (sets your payout rail)
- Complete KYB (US/CA: Cybrid-brokered; other: Circuit's Persona flow)
- Link a cashout account (US/CA: bank via Plaid; other: momo/bank via YellowCard) — §4
- Confirm
GET /merchants/{id}/readinessshowsproductionReady: true - (Optional) Ask Circuit to enable multi_account if you need more than one cashout account
- Issue test keys; integrate & test in sandbox
- Configure your webhook endpoint and verify the
Circuit-SignatureHMAC - Switch to live keys once production-ready
- Never fulfill on the redirect alone — fulfill on the verified webhook